MVVM Starter Kit (Part 3 of 3)
January 26, 2018 Erik van Bilsen
January 26, 2018 Erik van Bilsen
[SHOWTOGROUPS=4,20]
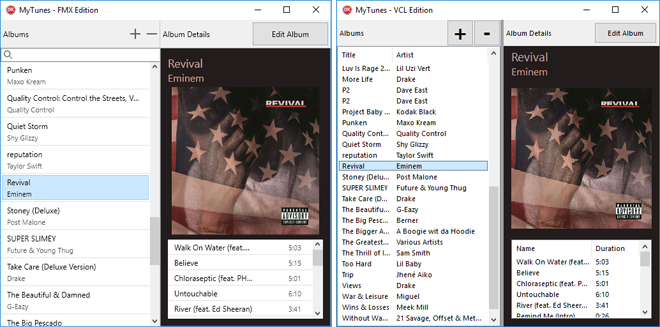
In this 3rd and final part of the MVVM series we tie everything together by looking at the Views and how to bind controls and actions to their ViewModels. We show that by putting most UI logic in the ViewModel, we can easily create both an FMX and VCL version of the same application with almost no code duplication.
You may want to review Для просмотра ссылки Войдиили Зарегистрируйся (where we introduce MVVM, data binding and Models) and Для просмотра ссылки Войди или Зарегистрируйся (where we focus on ViewModels and unit testing).
Views
When you start a new project in Delphi, you often start by designing a form. We take the opposite approach here and save the Views for last. And for a reason: thinking more in terms of Models and ViewModels makes it easier to avoid the pitfalls of putting (too much) code in the Views. Of course, in practice you will probably build out the Views and ViewModels at the same time, but it is good to take a step back and decide what code belongs in the View and what code should be part of the ViewModel.
Remember that one of the main reasons for using a pattern like MVVM is that it makes it easier to unit test UI and business logic. So ideally, you should have as little code in the Views as possible. In Delphi terms, this means your Views should only have code that manipulates VCL or FMX controls, or calls VCL or FMX APIs.

As a quick reminder: the View part is the only part of your application that can access VCL or FMX functionality. It uses the ViewModel through data binding and actions. The ViewModel contains the logic to operate the UI and uses the Model for its data and business logic.
We already talked extensively about data binding in Для просмотра ссылки Войдиили Зарегистрируйся. However, we focused mostly about binding individual values. In the next section, we look at how you can bind collections of objects, and how you can bind TAction components to execute methods in the ViewModel.
Binding Collections
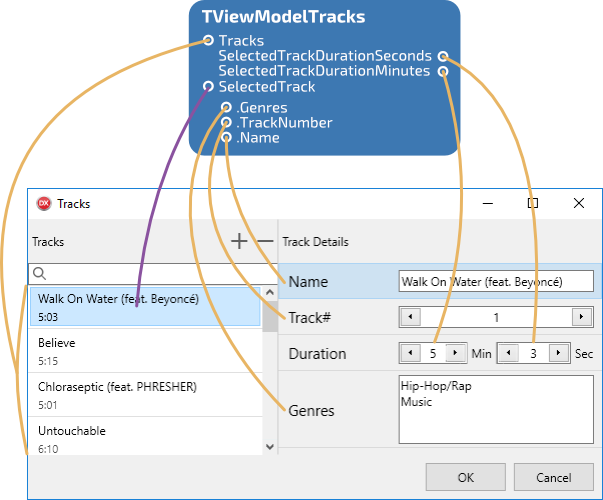
You have seen the following image before. It shows the data bindings of the tracks View (TViewTracks) and its ViewModel (TViewModelTracks):

For this to work, the collection must implement IgoNotifyCollectionChanged. You can implement this interface yourself, or you can use the TgoObservableCollection<T> class that implements it for you. This class is very similar to a generic list, but it sends notifications whenever an item is added, deleted or modified, or when the collection is cleared or rearranged somehow. The list-like controls use these notifications to update their view state.
In the MyTunes app, the tracks are stored in a TgoObservableCollection<TAlbumTrack>, and thus can be bound to a list-like control:
It uses the TgoDataBinder.BindCollection<T> method to create the binding. It expects 3 arguments:
When populating a list view, you must decide what data you want to show for each item in the list. In both VCL and FMX list views, each item usually has a caption and image index (in case an image list is used). In FMX list views, you often also provide a string with details. In the screenshot above, you can see that the caption of each list view item is set to the title of the track, and the details are set to the duration of the track. We don’t use image indices in this example.
To create this mapping, you derive a class from TgoDataTemplate, and pass that class as the last argument to the TgoDataBinder.BindCollection<T> method. Like the value converters discussed in part 1, this class only contains virtual class methods that you can override. You don’t have to instantiate the class.
You must always override the GetTitle method and can optionally override the GetDetail and GetImageIndex methods. All methods have a plain TObject parameter that you must typecast to the type of objects in your collection.
This is easier shown with an example. The TTemplateTrack class overrides the GetTitle and GetDetail methods to map the track name to the title and the track duration to the details:
Binding Actions
As you know by now, most UI logic is contained in the ViewModel. In the Для просмотра ссылки Войдиили Зарегистрируйся, we talked about action methods and predicates. The View calls these methods to perform the UI logic. It can do this directly, for example in response to a button press. However, you probably use a TActionList list and TAction‘s to organize the actions a user can take.
If that is the case, then you can use the data binder to bind these actions to the action methods and predicates in the ViewModel. You can either use TgoDataBinder.BindAction or TAction.Bind. Both do the same thing.
In the tracks View, we bind two actions:
The ActionAddTrack action is bound to the AddTrack method of the ViewModel. Similarly, the ActionDeleteTrack action is bound to a DeleteTrack method. However, this method is implemented in the View instead of the ViewModel (which I will explain in a bit). You can also see that there is an optional second parameter to the Bind method. This is a predicate that is used to determine if the action should be enabled or disabled. In the MyTunes app, it makes sense to only enable the Delete action if there is a track selected. The HasSelectedTrack predicate is implemented in the ViewModel.
UI Logic in the View
As a small side track: the reason that the DeleteTrack method is implemented in the View is that we want to ask the user for a confirmation before deleting the track. This confirmation requires a VCL or FMX dialog box, so it cannot be part of the ViewModel. The following code is FMX specific:
In the end, it calls the DeleteTrack method of the ViewModel.
However, with MVVM we want to move as much code as possible from the View to the ViewModel. That means that ideally you would want a version of MessageDialog that does not depend on the VCL or FMX. We could achieve this with the use of a procedural type (as we did for TgoBitmap in part 1). A better solution is probably to have something like a framework-independent TDialogService-like class that you can override for specific frameworks or for mocking and unit testing. I have not yet added something like this to the MVVM Starter Kit, but it would be a nice addition.
[/SHOWTOGROUPS]
In this 3rd and final part of the MVVM series we tie everything together by looking at the Views and how to bind controls and actions to their ViewModels. We show that by putting most UI logic in the ViewModel, we can easily create both an FMX and VCL version of the same application with almost no code duplication.
You may want to review Для просмотра ссылки Войди
Views
When you start a new project in Delphi, you often start by designing a form. We take the opposite approach here and save the Views for last. And for a reason: thinking more in terms of Models and ViewModels makes it easier to avoid the pitfalls of putting (too much) code in the Views. Of course, in practice you will probably build out the Views and ViewModels at the same time, but it is good to take a step back and decide what code belongs in the View and what code should be part of the ViewModel.
Remember that one of the main reasons for using a pattern like MVVM is that it makes it easier to unit test UI and business logic. So ideally, you should have as little code in the Views as possible. In Delphi terms, this means your Views should only have code that manipulates VCL or FMX controls, or calls VCL or FMX APIs.

As a quick reminder: the View part is the only part of your application that can access VCL or FMX functionality. It uses the ViewModel through data binding and actions. The ViewModel contains the logic to operate the UI and uses the Model for its data and business logic.
We already talked extensively about data binding in Для просмотра ссылки Войди
Binding Collections
You have seen the following image before. It shows the data bindings of the tracks View (TViewTracks) and its ViewModel (TViewModelTracks):

We briefly discussed that you can bind certain types of collections to list-like controls such as TListView.The Views in the sample applications won’t win any design awards (although they may qualify for an equivalent of the Golden Raspberry), but that is not the point here. They are purely for demonstrating a couple of ways to create Views and ViewModels. The designs are especially bad for mobile platforms. But the beauty of MVVM is that you can design completely different forms for a mobile experience while reusing your existing Models and ViewModels.
For this to work, the collection must implement IgoNotifyCollectionChanged. You can implement this interface yourself, or you can use the TgoObservableCollection<T> class that implements it for you. This class is very similar to a generic list, but it sends notifications whenever an item is added, deleted or modified, or when the collection is cleared or rearranged somehow. The list-like controls use these notifications to update their view state.
In the MyTunes app, the tracks are stored in a TgoObservableCollection<TAlbumTrack>, and thus can be bound to a list-like control:
| 1 2 3 4 5 6 7 | procedure TViewTracks.SetupView; begin ... { Bind collections } Binder.BindCollection<TAlbumTrack>(ViewModel.Tracks, ListViewTracks, TTemplateTrack); end; |
- The source collection to bind. The source must derive from TEnumerable<T>, which many collections such as TList<T> do. You generally want to provide a collection that also implements the IgoNotifyCollectionChanged interface (such as TgoObservableCollection<T> described above).
- The target View to bind to. This is a class that implements the IgoCollectionViewProvider interface. We haven’t discussed this interface since you generally don’t need to implement it yourself. It is implemented in controls like TListBox and TListView.
- A template class that defines the mapping between properties of each item in the collection and the corresponding item in the View. We’ll introduce this class next.
When populating a list view, you must decide what data you want to show for each item in the list. In both VCL and FMX list views, each item usually has a caption and image index (in case an image list is used). In FMX list views, you often also provide a string with details. In the screenshot above, you can see that the caption of each list view item is set to the title of the track, and the details are set to the duration of the track. We don’t use image indices in this example.
To create this mapping, you derive a class from TgoDataTemplate, and pass that class as the last argument to the TgoDataBinder.BindCollection<T> method. Like the value converters discussed in part 1, this class only contains virtual class methods that you can override. You don’t have to instantiate the class.
You must always override the GetTitle method and can optionally override the GetDetail and GetImageIndex methods. All methods have a plain TObject parameter that you must typecast to the type of objects in your collection.
This is easier shown with an example. The TTemplateTrack class overrides the GetTitle and GetDetail methods to map the track name to the title and the track duration to the details:
| 1 2 3 4 5 6 7 8 9 10 11 12 13 14 15 16 17 18 19 20 21 | type TTemplateTrack = class(TgoDataTemplate) public class function GetTitle(const AItem: TObject): String; override; class function GetDetail(const AItem: TObject): String; override; end; class function TTemplateTrack.GetTitle(const AItem: TObject): String; begin Assert(AItem is TAlbumTrack); Result := TAlbumTrack(AItem).Name; end; class function TTemplateTrack.GetDetail(const AItem: TObject): String; var Track: TAlbumTrack absolute AItem; begin Assert(AItem is TAlbumTrack); Result := Format('%d:%.2d', [Track.Duration.Minutes, Track.Duration.Seconds]); end; |
As you know by now, most UI logic is contained in the ViewModel. In the Для просмотра ссылки Войди
If that is the case, then you can use the data binder to bind these actions to the action methods and predicates in the ViewModel. You can either use TgoDataBinder.BindAction or TAction.Bind. Both do the same thing.
In the tracks View, we bind two actions:
| 1 2 3 4 5 6 7 | procedure TViewTracks.SetupView; begin ... { Bind actions } ActionAddTrack.Bind(ViewModel.AddTrack); ActionDeleteTrack.Bind(Self.DeleteTrack, ViewModel.HasSelectedTrack); end; |
UI Logic in the View
As a small side track: the reason that the DeleteTrack method is implemented in the View is that we want to ask the user for a confirmation before deleting the track. This confirmation requires a VCL or FMX dialog box, so it cannot be part of the ViewModel. The following code is FMX specific:
| 1 2 3 4 5 6 7 8 9 10 11 12 13 14 | procedure TViewTracks.DeleteTrack; begin Assert(Assigned(ViewModel.SelectedTrack)); TDialogService.MessageDialog( Format('Are you sure you want to delete track "%s"?', [ViewModel.SelectedTrack.Name]), TMsgDlgType.mtConfirmation, [TMsgDlgBtn.mbYes, TMsgDlgBtn.mbNo], TMsgDlgBtn.mbNo, 0, procedure(const AResult: TModalResult) begin if (AResult = mrYes) then ViewModel.DeleteTrack; end); end; |
However, with MVVM we want to move as much code as possible from the View to the ViewModel. That means that ideally you would want a version of MessageDialog that does not depend on the VCL or FMX. We could achieve this with the use of a procedural type (as we did for TgoBitmap in part 1). A better solution is probably to have something like a framework-independent TDialogService-like class that you can override for specific frameworks or for mocking and unit testing. I have not yet added something like this to the MVVM Starter Kit, but it would be a nice addition.
[/SHOWTOGROUPS]


