Learn To Build A Python GUI For Computer Vision Tasks With Powerful OpenCV Library In A Delphi Windows App
February 25, 2021 By Muhammad Azizul Hakim
Are you looking for a powerful computer vision library and build a nice GUI for them? Try Для просмотра ссылки Войдиили Зарегистрируйся library for Python. And for the GUI part, you can run it seamlessly with Для просмотра ссылки Войди или Зарегистрируйся (P4D). P4D is a free and simple tool that allows you to run Python scripts as well as create new Python modules and types in Delphi.
OpenCV (Open Source Computer Vision Library) is an open-source computer vision and machine learning software library. OpenCV was built to provide a common infrastructure for computer vision applications and to accelerate the use of machine perception in commercial products.
This post will guide you on how to run the OpenCV library to solve computer vision problems and use Python for Delphi to display it in the Delphi Windows GUI app.
First, open and run our Python GUI using project Demo1 from Python4Delphi with RAD Studio. Then insert the script into the lower Memo, click the Execute button, and get the result in the upper Memo. You can find the Demo1 source on Для просмотра ссылки Войдиили Зарегистрируйся. The behind the scene details of how Delphi manages to run your Python code in this amazing Python GUI can be found at this Для просмотра ссылки Войди или Зарегистрируйся.

OpenCV is an open-source library for computer vision and machine learning that supports various programming languages including Python.
OpenCV has more than 2500 optimized algorithms, which includes a comprehensive set of both classic and state-of-the-art computer vision and machine learning algorithms. These algorithms can be used to detect and recognize faces, identify objects, classify human actions in videos, track camera movements, track moving objects, extract 3D models of objects, produce 3D point clouds from stereo cameras, stitch images together to produce a high-resolution image of an entire scene, find similar images from an image database, remove red eyes from images taken using flash, follow eye movements, recognize scenery and establish markers to overlay it with augmented reality, etc.
This post will introduce you to some basic computer vision operations using OpenCV and we will run it in Python GUI.
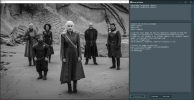
The code above will display the image on our screen using OpenCV, and will print the width, height, and depth data about our image:

The result:

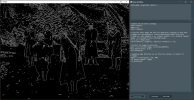
Let’s perform edge detection to see how the process works, using the following code:
This operation was performed using the popular Canny algorithm (developed by John F. Canny in 1986) to find the edges in the image.
We provide three parameters to the cv2.Canny function:

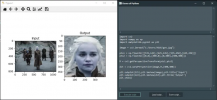
To perform perspective transformation with an image, we use the warpPerspective() function. The parameters of this function are the original image, the transformation matrix, and the size of the output image. Use getPerspectiveTransform() function to get the transformation matrix. You need to pass four points of the input image and the corresponding four points of the output image to this function. Important to note that three of the four points should not be on the same straight line.
Let’s see the result:

Congratulations, now you have learned how to run the OpenCV library to solve computer vision problems and use Python for Delphi to display it in the Delphi Windows GUI app! Now you can make various modifications to your images or learn more computer vision operations using OpenCV library and Python4Delphi.
Check out the OpenCV computer vision library for Python and use it in your projects: Для просмотра ссылки Войдиили Зарегистрируйся and
Check out Python4Delphi which easily allows you to build Python GUIs for Windows using Delphi: Для просмотра ссылки Войдиили Зарегистрируйся
February 25, 2021 By Muhammad Azizul Hakim
Are you looking for a powerful computer vision library and build a nice GUI for them? Try Для просмотра ссылки Войди
OpenCV (Open Source Computer Vision Library) is an open-source computer vision and machine learning software library. OpenCV was built to provide a common infrastructure for computer vision applications and to accelerate the use of machine perception in commercial products.
This post will guide you on how to run the OpenCV library to solve computer vision problems and use Python for Delphi to display it in the Delphi Windows GUI app.
First, open and run our Python GUI using project Demo1 from Python4Delphi with RAD Studio. Then insert the script into the lower Memo, click the Execute button, and get the result in the upper Memo. You can find the Demo1 source on Для просмотра ссылки Войди

OpenCV is an open-source library for computer vision and machine learning that supports various programming languages including Python.
OpenCV has more than 2500 optimized algorithms, which includes a comprehensive set of both classic and state-of-the-art computer vision and machine learning algorithms. These algorithms can be used to detect and recognize faces, identify objects, classify human actions in videos, track camera movements, track moving objects, extract 3D models of objects, produce 3D point clouds from stereo cameras, stitch images together to produce a high-resolution image of an entire scene, find similar images from an image database, remove red eyes from images taken using flash, follow eye movements, recognize scenery and establish markers to overlay it with augmented reality, etc.
This post will introduce you to some basic computer vision operations using OpenCV and we will run it in Python GUI.
1. Loading and Displaying an Image
Let’s begin by running the following code in our Python4Delphi VCL:
Python:
# Import the necessary packages
import imutils
import cv2
import argparse

# Load the input image and show its dimensions, keeping in mind that
# images are represented as a multi-dimensional NumPy array with
# shape no. rows (height) x no. columns (width) x no. channels (depth)
image = cv2.imread("C:/Users/ASUS/got.jpg")
(h, w, d) = image.shape
print("width={}, height={}, depth={}".format(w, h, d))

# Display the image to our screen -- we will need to click the window
# open by OpenCV and press a key on our keyboard to continue execution
cv2.imshow("Image", image)
cv2.waitKey(0)
2. Converting an Image to Grayscale
Here is the code to convert our image to grayscale:
Python:
# Import the necessary packages
import imutils
import cv2
import argparse

# Load the input image and show its dimensions, keeping in mind that
# images are represented as a multi-dimensional NumPy array with
# shape no. rows (height) x no. columns (width) x no. channels (depth)
image = cv2.imread("C:/Users/ASUS/got.jpg")
(h, w, d) = image.shape
print("width={}, height={}, depth={}".format(w, h, d))

# Convert the image to grayscale
gray = cv2.cvtColor(image, cv2.COLOR_BGR2GRAY)
cv2.imshow("Gray", gray)
cv2.waitKey(0)
3. Edge Detection
Edge detection is useful for finding boundaries of objects in an image—it is effective for segmentation purposes.Let’s perform edge detection to see how the process works, using the following code:
Python:
# Import the necessary packages
import imutils
import cv2
import argparse

# Load the input image and show its dimensions, keeping in mind that
# images are represented as a multi-dimensional NumPy array with
# shape no. rows (height) x no. columns (width) x no. channels (depth)
image = cv2.imread("C:/Users/ASUS/got.jpg")
(h, w, d) = image.shape
print("width={}, height={}, depth={}".format(w, h, d))

# Convert the image to grayscale
gray = cv2.cvtColor(image, cv2.COLOR_BGR2GRAY)
#cv2.imshow("Gray", gray)
#cv2.waitKey(0)

# Applying edge detection we can find the outlines of objects in
# images
edged = cv2.Canny(gray, 175, 200)
cv2.imshow("Edged", edged)
cv2.waitKey(0)We provide three parameters to the cv2.Canny function:
- img: The gray image.
- minVal: A minimum threshold, in our case we set it to 175.
- maxVal: The maximum threshold which is 200 in our example.

4. Perspective Transformation of an Image
With this operation, we want to zoom-in Daenerys Targaryen face using perspective transformation:
Python:
import cv2
import numpy as np
import matplotlib.pyplot as plt

image = cv2.imread("C:/Users/ASUS/got.jpg")

pts1 = np.float32([[535,145],[625,145],[535,250],[625,250]])
pts2 = np.float32([[0,0],[400,0],[0,400],[400,400]])

M = cv2.getPerspectiveTransform(pts1,pts2)

dst = cv2.warpPerspective(image,M,(400,400))

plt.subplot(121),plt.imshow(image),plt.title('Input')
plt.subplot(122),plt.imshow(dst),plt.title('Output')
plt.show()Let’s see the result:

Congratulations, now you have learned how to run the OpenCV library to solve computer vision problems and use Python for Delphi to display it in the Delphi Windows GUI app! Now you can make various modifications to your images or learn more computer vision operations using OpenCV library and Python4Delphi.
Check out the OpenCV computer vision library for Python and use it in your projects: Для просмотра ссылки Войди
Check out Python4Delphi which easily allows you to build Python GUIs for Windows using Delphi: Для просмотра ссылки Войди
