
Threads
Let’s start with threads. If you ever tried running an app from Xcode, you heard about the Main thread. So, what are threads, how many of them are there, and how do we use them?A thread is a single sequential flow of control within a program, which means that each process has at least one thread. In iOS, the primary thread on which the process is started is commonly referred to as the Main thread. This is the thread in which all UI elements are created and managed. All interrupts related to user interaction are ultimately dispatched to the UI thread where the handler code is written — your IBAction methods are all executed in the main thread. The real thing is knowing how to use multiple threads simultaneously, which is called concurrent programming. This is basically a fancy way of saying running multiple tasks at the same time, but we will get to that a bit later.
The first question that pops in my mind is: Can’t we just run multiple tasks on a single thread? Sure why not, but that is not always a good solution. Small tasks in small numbers can be run together because of the hardware we have today. When it comes to complicated and more complex tasks, you should use background threads and see that fancy concurrent programming in action.
If we run 2 tasks at the same time on the main thread, they would be done using the “criss-cross” technique. Meaning that the thread would complete part of the first task, then part of the second, then back to the first, and again, the second one, until one of them is completed.
Here is an example that should help you understand and visualize the tasks being completed:
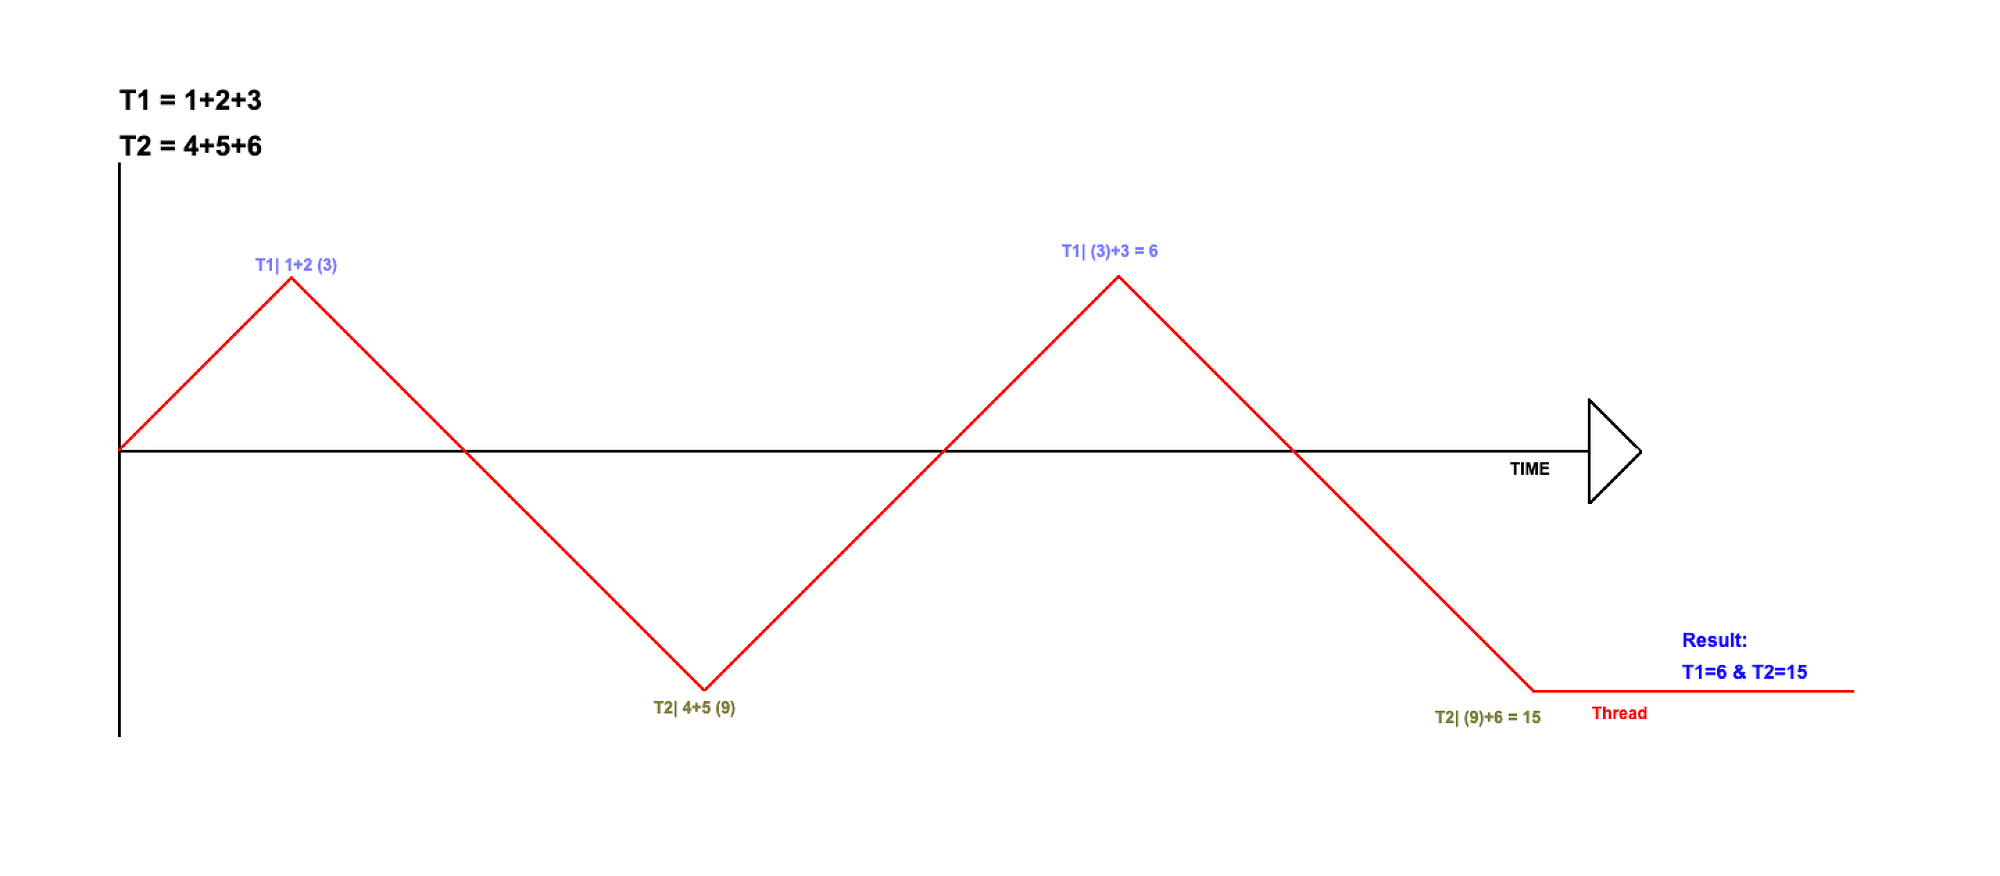
We have two mathematical operations (tasks) to complete. The first one will be 1+2+3, and the second one 4+5+6. Let's say that a thread is the math teacher that will show us the result of these two operations. The thread will begin with the first task 1+2+3 and complete the first part, which is 1+2, after that it will solve the first part of the second task, which is 4+5. Right after solving the first part of the second task, it will go back to the first one and solve the second part, which is now 3+3 ([1+2 = 3, -> 3+3]). At this moment the first task is completed and the thread proceeds to resolve the second task.
Here is a visualization, I tried my best!
How do we use concurrent programming? It’s pretty simple, we can use two threads instead of just one. Here is a simple example in code.
Код:
import UIKit
class ViewController: UIViewController {
override func viewDidLoad()
super.viewDidLoad()
}
override func viewDidAppear(_ animated: Bool) {
super.viewDidAppear(animated)
DispatchQueue.global(qos: .userInitiated).async {
let result1 = self.performTask1()
print("This is run on a background queue and the result is \(result1)")
DispatchQueue.main.async {
let result2 = self.performTask2()
print("This is run on the main queue, after the previous code in outer block and the result is \(result2)")
}
}
}
func performTask1() -> Int {
return 1+2+3
}
func performTask2() -> Int {
return 4+5+6
}
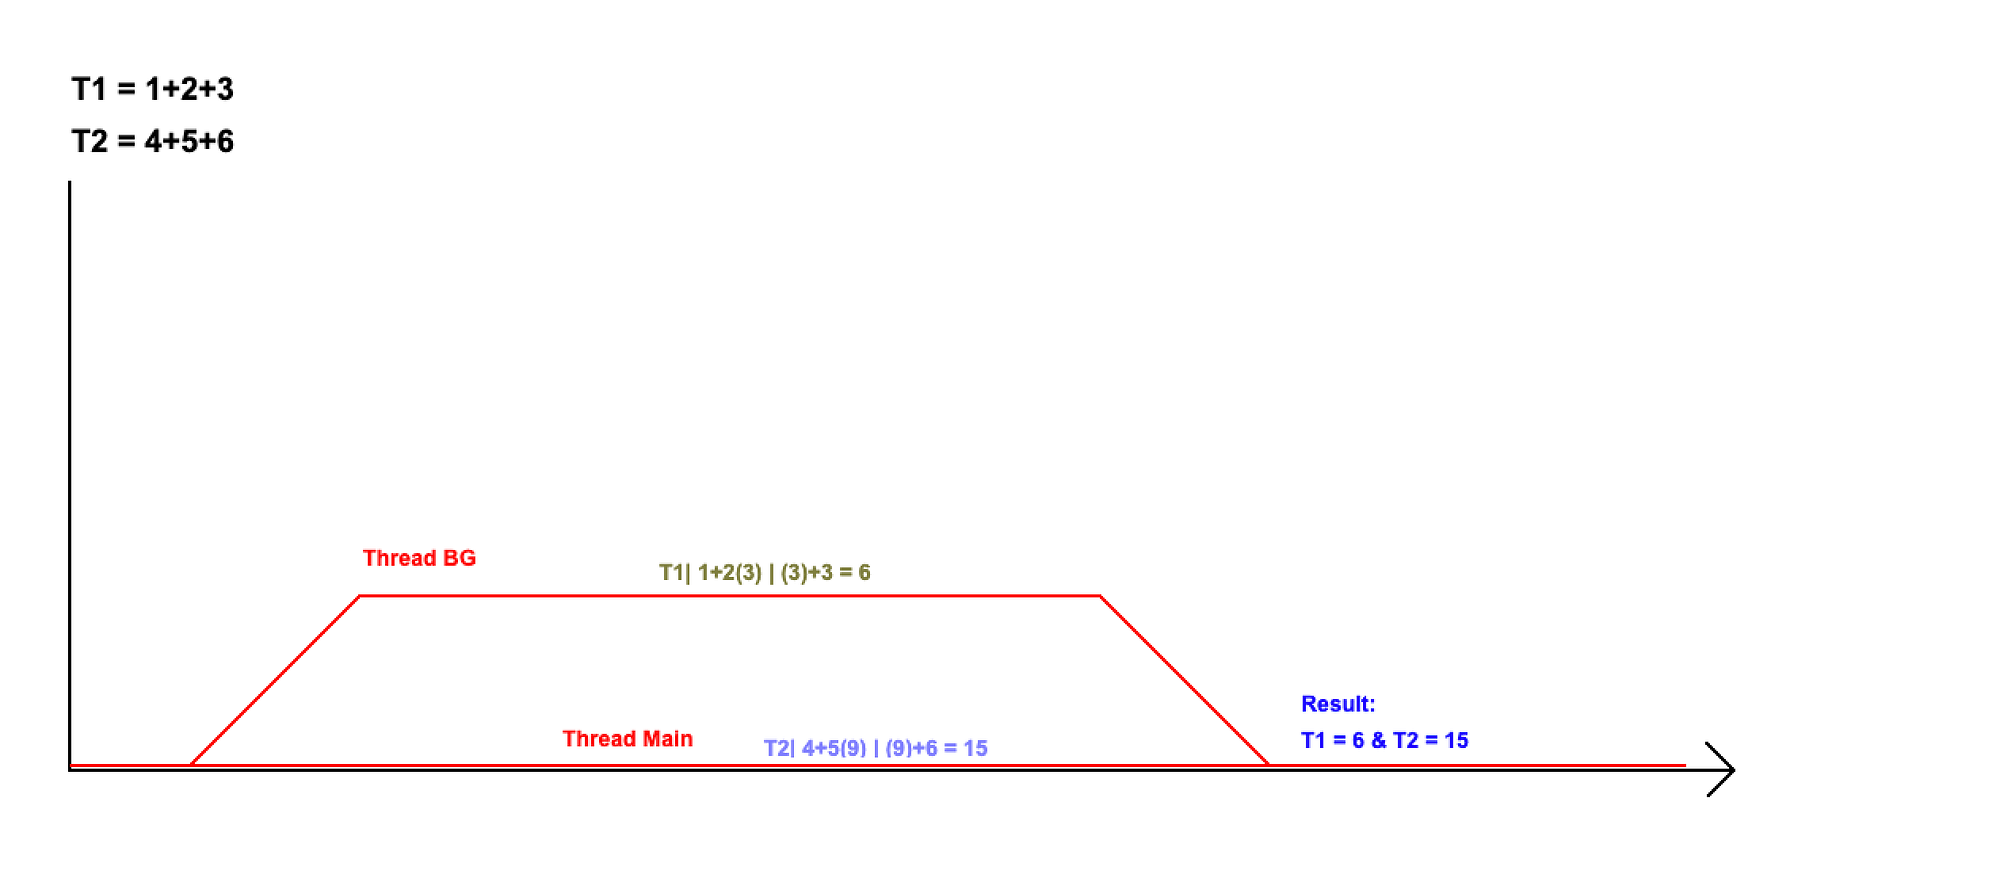
}Here we are using the background thread as another math teacher that solves one mathematical operation, while the second teacher, our Main thread, is solving the other one. Here is the visualization:
In our example, we are using the background thread to solve a simple mathematical operation. Background threads are usually used when you have to download an image, make an API call or perform a task that will take some time. The question is, how do we know when the task is completed? Well, Swift provides us with a powerful tool called closures. Closures or completion handlers are a chunk of code that provides further instructions on what to do after the initial task is done. Most likely, you have seen this while presenting another controller on top of the current one
Код:
self.present(vc, animated: true, completion:(() -> Void)?)For example, after presenting the new view controller, we can print something in the log:
Код:
self.present(vc, animated: true) {
print("New view presented")
}
The same goes for background threads, after some API call is completed, we can use the closure to further process the data we obtained, and keep in mind that you should always update the UI from the main thread. Here is an example of downloading an image:
Код:
import UIKitclass ViewController: UIViewController {   let imageView: UIImageView = UIImageView()   override func viewDidLoad() {
super.viewDidLoad()
}   override func viewDidAppear(_ animated: Bool) {
print("Begin of code")
let url = URL(string: "https://image.shutterstock.com/image-vector/example-red-square-grunge-stamp-600w-327662909.jpg")!
downloadImage(from: url)
print("End of code. The image will continue downloading in the background and it will be loaded when it ends.")
}   func getData(from url: URL, completion: @escaping (Data?, URLResponse?, Error?) -> ()) {
URLSession.shared.dataTask(with: url, completionHandler: completion).resume()
}   func downloadImage(from url: URL) {
print("Download Started")
getData(from: url) { data, response, error in
guard let data = data, error == nil else { return }
print(response?.suggestedFilename ?? url.lastPathComponent)
print("Download Finished")
// Always update the UI from the main thread!
DispatchQueue.main.async() { [weak self] in
self?.imageView.image = UIImage(data: data)
}
}
}
}
Memory management
At first, there was no ARC back in the Objective C days. We used to retain and release objects by ourselves. Nowadays, there is ARC (Automatic Reference Counting) that does this automatically. Xcode takes care of the job in compile time.Automatic Reference Counting manages object life cycles by keeping track of all valid references to an object with an internal retain count. Once all references to an object go out of scope or are cleared, and the retain count thus reaches zero, the object and its underlying memory are automatically freed.
There are two main problems with memory management. The first one being freeing or overwriting data that is still in use, and the second one, not freeing data that is no longer in use which then causes memory leaks.
If you free or overwrite the data that is still in use, you can cause memory corruption which usually results in your application crashing or worse, corrupted user data.
When allocated memory is not freed even though it is never going to be used again, it is known as a memory leak. Leaks cause your application to use ever-increasing amounts of memory, which in turn may result in poor system performance or your application being terminated. For example, if you for some reason load a video of 200Mb size on one screen, and right after that continue to the second screen without freeing the allocated memory for that video, and then come back to the first screen, again allocating new 2000Mb for the video, you will populate too much memory After doing this a few more times, your app will crash.
To avoid doing these mistakes, here are three awesome rules that you can follow:
- We own the objects we create, and we have to subsequently release them when they are no longer needed.
- Use Retain to gain ownership of an object that you did not create. You have to release these objects too when they are not needed.
- Don’t release the objects that you don’t own.
Xcode provides some tools to help with memory management. To use, you should select the Debug Navigator on the left Toolbar. You should see the Memory window being the second.
If you wish to use more advanced tools, you can open the Instruments app with the Profile in Instruments in the top right corner.
Bonus — Singleton objects
I’m pretty sure that you heard about the singleton objects. Singleton object is a shared resource within a single unique class instance. For example, let's say that you have an object that contains some strings (we will call this object Words) that will be used to populate some labels.You can either create a single instance of the Words object and use it through the app, or you can create a new instance every time you need to populate the label.
Here is an example of using the singleton object:
First, we will create an object Words that will contain the strings that we need to populate the labels.
Код:
import Foundationclass Words: NSObject {   var firstWord = "Church"
var secondWord = "Palace"
var thirdWord = "Castle"

static let shared = Words()}
Simple, right? Notice that there is a static let shared which we will use. That is our singleton object. Now back to our ViewController that contains three labels. Here is how it should look like:
Код:
import UIKitclass ViewController: UIViewController {   var firstLabel = UILabel()
var secondLabel = UILabel()
var thirdLabel = UILabel()   override func viewDidLoad() {
super.viewDidLoad()
}   override func viewDidAppear(_ animated: Bool) {
super.viewDidAppear(animated)      firstLabel.text = Words.shared.firstWord
secondLabel.text = Words.shared.secondWord
thirdLabel.text = Words.shared.thirdWord
}
}
Notice that we never made a new instance of the Words object using Words(), but keep in mind that even after populating the labels, our singleton Words object still lives, and will continue living its long life until you terminate the app.
Now let’s try doing the same thing without the singleton object. This is how our Words object will look like:
Код:
import Foundationstruct Words {   var firstWord = "Church"
var secondWord = "Palace"
var thirdWord = "Castle"
}
Much cleaner and simpler, right? Now how do we use this object to populate the labels? Now we need to make a new instance of the Words object every time we want to use it. Here is how our ViewController will look like:
Код:
import UIKitclass ViewController: UIViewController {   var firstLabel = UILabel()
var secondLabel = UILabel()
var thirdLabel = UILabel()   override func viewDidLoad() {
super.viewDidLoad()
}   override func viewDidAppear(_ animated: Bool) {
super.viewDidAppear(animated)      firstLabel.text = Words().firstWord
secondLabel.text = Words().secondWord
thirdLabel.text = Words().thirdWord
}
}
Here you can notice that every time we need a property of an object Words we are making a new instance of that object using Words(). This way we are using the memory constantly, but only when we need it, and after we have used it the memory will be freed for usage in the future.
Singletons were popular in the Objective C era. They are not always a great solution, so use them only if you really have to. They also make debugging and unit testing very hard.
As always, I hope this helps, and happy coding. Cheers!