From Bindings List to Visual LiveBindings
By Marco Cantu June 17, 2021
Having looked into Delphi’s expression engine, component bindings, and the bindings list component, we can now look at the easy and intuitive way to configure an application with dynamic bindings, the Visual LiveBindings design surface.
Over the past few weeks, I blogged about Для просмотра ссылки Войдиили Зарегистрируйся,Для просмотра ссылки Войди или Зарегистрируйся, and theДля просмотра ссылки Войди или Зарегистрируйся. Now it is time to put it all together by looking at the visual tools Delphi makes available to easily configure bindings. This is called LiveBindings Designer (available under the View | Tool Windows menu) and it’s an additional pane you can display alongside a design time form or data module.
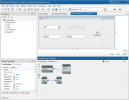
Here is how the demo from the last blog post looks in the LiveBindings Designer:

Now if you want to create some of the bindings directly in the designer, you can do the following sample steps:

Now, enable the inline arrows to change the value and it will work with no code. Alternatively, if you type in the NumberBox, the value gets refreshed when you leave the control (so you need at least another control that can receive the input focus.
Now this is a very simple scenario, there are many properties of controls you can connect, but you might need to expand the “bindable” properties from the default ones, by selecting the three dots at the bottom of the elements in the LiveBindings designer.

Now it is important to notice that this designer and the related wizards are primarily focused on database data binding scenarios, which is why associating UI controls doesn’t always work easily. We’ll look into data bindings in a future blog post.
By Marco Cantu June 17, 2021
Having looked into Delphi’s expression engine, component bindings, and the bindings list component, we can now look at the easy and intuitive way to configure an application with dynamic bindings, the Visual LiveBindings design surface.
Over the past few weeks, I blogged about Для просмотра ссылки Войди
Here is how the demo from the last blog post looks in the LiveBindings Designer:

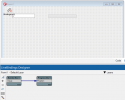
Now if you want to create some of the bindings directly in the designer, you can do the following sample steps:
- Open a new form
- Drop a NumberBox controls and a Progressbar controls
- In the LiveBindings designer drag from the Value property of the NumberBox to the Progress property of the Progressbar, like below:

Now, enable the inline arrows to change the value and it will work with no code. Alternatively, if you type in the NumberBox, the value gets refreshed when you leave the control (so you need at least another control that can receive the input focus.
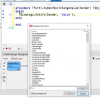
Now this is a very simple scenario, there are many properties of controls you can connect, but you might need to expand the “bindable” properties from the default ones, by selecting the three dots at the bottom of the elements in the LiveBindings designer.

Now it is important to notice that this designer and the related wizards are primarily focused on database data binding scenarios, which is why associating UI controls doesn’t always work easily. We’ll look into data bindings in a future blog post.
