FMX Linux - Configuration
Germán Estévez - 10/Jul/2019
Germán Estévez - 10/Jul/2019
[SHOWTOGROUPS=4,20]
Surely those of you who are a little aware of the Delphi news, the headline of this article will not surprise you.
It has been posted on Delphi related forums and groups. We already have a tool that allows us to add some versions of Linux ( Для просмотра ссылки Войдиили Зарегистрируйся ) to the list of development platforms for Delphi.
It is available in the Architect and Enterprise version of Delphi, and for the rest via GetIt! It can be downloaded in demo mode.
The package proposes to generate applications in FireMonkey with Delphi and using FMX Linux, they will be available in Linux (using the Embarcadero compiler for Linux for this).
I do not have great knowledge of Linux / Unix, so I have proposed for this post to try to start the package and get to generate an executable in Linux with the documentation of the Embarcadero wiki to see if I am capable. In this way also assess the difficulty of doing it for someone with little knowledge like me.
First Step: Installation via GetIt!
It is the easiest way to do it, since the work for us is nil. We select the package in GetIt and click Install . Once the license is accepted, the wizard will be in charge of installing, registering and restarting the IDE to complete the last steps.
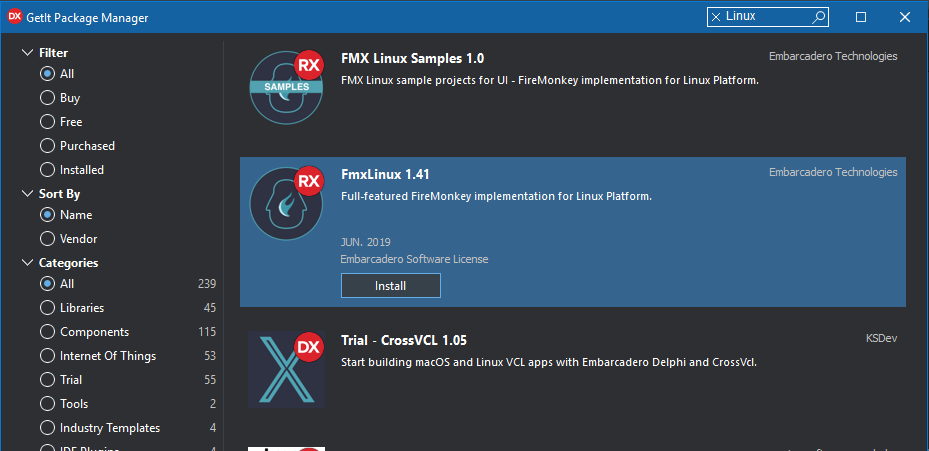
It doesn't take long for the package to be installed smoothly.
Для просмотра ссылки Войдиили Зарегистрируйся
Once finished, as I have mentioned, the IDE will restart.
Step 2: Create the “Connection Profile”
The “Connection Profile” is the information that allows us to communicate the machine in which we are developing with Delphi, with the Linux machine where we are going to carry out the Deployment (and where we will later install the PAServer ).
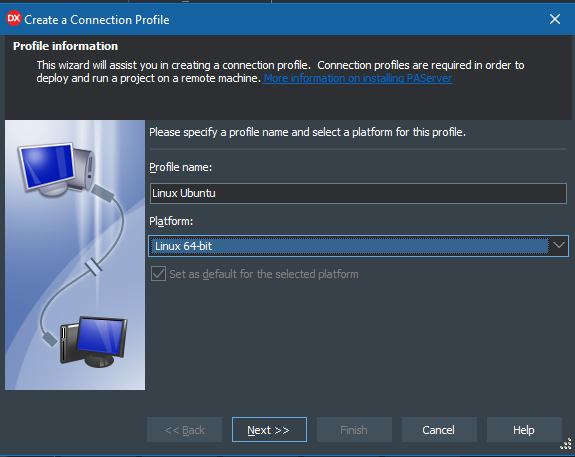
The first thing is to identify the new connection, with a name and the system on which we are creating the new profile:
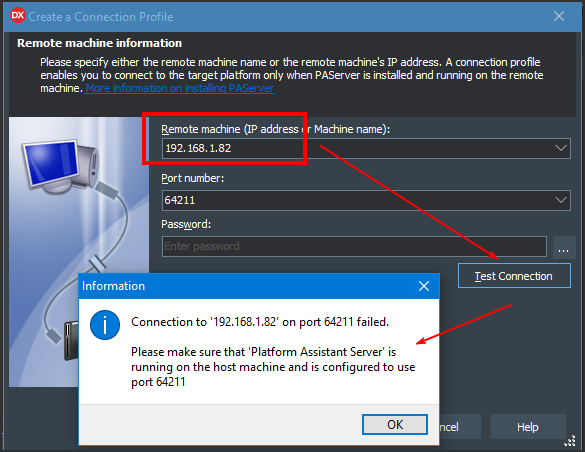
The next steps is to define the IP and the connection port together with a password (optional) if we want it for the connection.
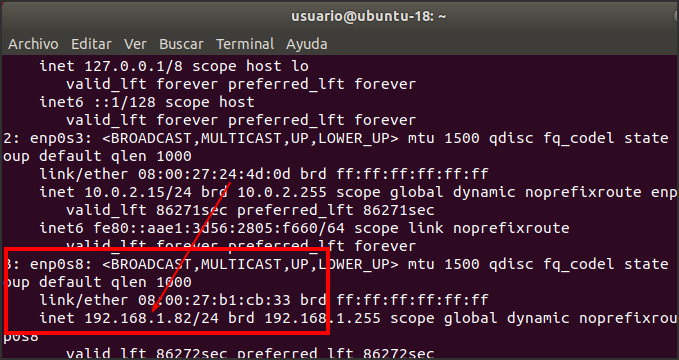
If we need to know the IP address of our Linux machine (in my case it is an Ubuntu machine on the same network) you can find out the IP with the command:
>> ip to list
We will obtain a list of the installer network connectors and among their properties we can see the configured IP. The port is given to us by default and unless there are problems we should not change it.
At this point and as seen in the penultimate image, if we click on the "Test Connection" button we will get an error because the PAserver is not installed. In this step there is nothing else to do. In the next we will see how to install it and if everything is correct, we can return to this screen and test the connection again later (when we have already installed it).
Step 3: Install PAServer on Linux
In order for the Delphi IDE (in Windows) to “dialogue” with our Linux machine (Ubuntu in my case) we must install the PAServer. It is the piece that allows this communication.
Detailed steps are Для просмотра ссылки Войдиили Зарегистрируйся .
Once Delphi is installed, in the Delphi installation directories there is a .tar file with the program, or even simpler directly from the Linux machine, download it from the Web and install it.
If at this point we do the previous check again, in the “Connection Profiler” wizard , it should give us that the connection is now correct.
Для просмотра ссылки Войдиили Зарегистрируйся
Step 4: Add the SDK for Linux.
In order to compile projects in Linux, we must (similarly to what is done for other platforms like Android) add the necessary SDK to be able to compile. This step is done automatically by the wizard (SDK Manager) and we only have to select the necessary SDK.
Just go to Tools / Options / SDK Manager and from there add a new one.
Among the platforms available, depending on the installation we have carried out, we will have (Windows, Android, Linux , ...)
Для просмотра ссылки Войдиили Зарегистрируйся
Just select that we want the Linux SDK and click OK.
Для просмотра ссылки Войдиили Зарегистрируйся
By default this SDK installs everything necessary for the applications that Delphi (“out of the box”) generates for Linux. In this case, "FMX Linux" allows generating applications with a graphic part, therefore it is necessary to install the necessary dependencies on the Linux machine.
You can install these dependencies with the following command:
sudo apt install libgl1-table-glx libglu1-table libgtk-3-common libgstreamer1.0 libgstreamer-plugins-base1.0
You have the explanation of this step Для просмотра ссылки Войдиили Зарегистрируйся .
Once we have reached this point, we already have the environment ready.
STEP 5: Compile the project for Linux
Now we can open the project that we want to execute and click on it with the right mouse button in the Project Inspector. If everything went well, a new option “Add Linux Platform” appears.
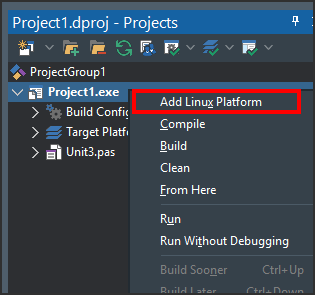
We must select this option and once this is done, the Linux option appears to define it as “Target platform”.
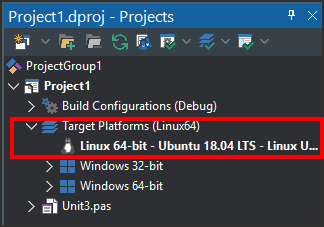
As it could not be otherwise my first project to carry out the tests has been a " Hello world!".
Once compiled and executed, the operation is as expected. ;-D
Here you have some images of the result.
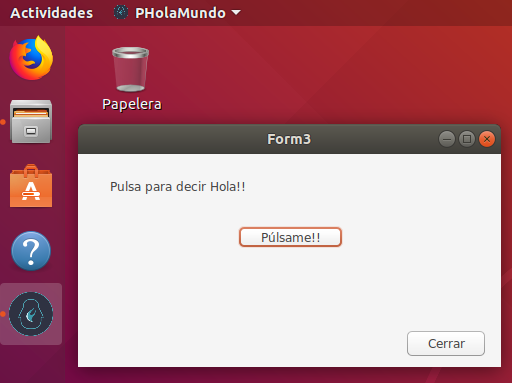
Для просмотра ссылки Войдиили Зарегистрируйся
With this same project I have tried to Debug (step by step) the program running on Ubuntu and it has worked without problems.
[/SHOWTOGROUPS]
Surely those of you who are a little aware of the Delphi news, the headline of this article will not surprise you.
It has been posted on Delphi related forums and groups. We already have a tool that allows us to add some versions of Linux ( Для просмотра ссылки Войди
It is available in the Architect and Enterprise version of Delphi, and for the rest via GetIt! It can be downloaded in demo mode.
The package proposes to generate applications in FireMonkey with Delphi and using FMX Linux, they will be available in Linux (using the Embarcadero compiler for Linux for this).
I do not have great knowledge of Linux / Unix, so I have proposed for this post to try to start the package and get to generate an executable in Linux with the documentation of the Embarcadero wiki to see if I am capable. In this way also assess the difficulty of doing it for someone with little knowledge like me.
First Step: Installation via GetIt!
It is the easiest way to do it, since the work for us is nil. We select the package in GetIt and click Install . Once the license is accepted, the wizard will be in charge of installing, registering and restarting the IDE to complete the last steps.

It doesn't take long for the package to be installed smoothly.
Для просмотра ссылки Войди
Once finished, as I have mentioned, the IDE will restart.
Step 2: Create the “Connection Profile”
The “Connection Profile” is the information that allows us to communicate the machine in which we are developing with Delphi, with the Linux machine where we are going to carry out the Deployment (and where we will later install the PAServer ).
The first thing is to identify the new connection, with a name and the system on which we are creating the new profile:

The next steps is to define the IP and the connection port together with a password (optional) if we want it for the connection.

If we need to know the IP address of our Linux machine (in my case it is an Ubuntu machine on the same network) you can find out the IP with the command:
>> ip to list
We will obtain a list of the installer network connectors and among their properties we can see the configured IP. The port is given to us by default and unless there are problems we should not change it.

At this point and as seen in the penultimate image, if we click on the "Test Connection" button we will get an error because the PAserver is not installed. In this step there is nothing else to do. In the next we will see how to install it and if everything is correct, we can return to this screen and test the connection again later (when we have already installed it).
Step 3: Install PAServer on Linux
In order for the Delphi IDE (in Windows) to “dialogue” with our Linux machine (Ubuntu in my case) we must install the PAServer. It is the piece that allows this communication.
Detailed steps are Для просмотра ссылки Войди
Once Delphi is installed, in the Delphi installation directories there is a .tar file with the program, or even simpler directly from the Linux machine, download it from the Web and install it.
- Для просмотра ссылки Войди
или Зарегистрируйся - Для просмотра ссылки Войди
или Зарегистрируйся
If at this point we do the previous check again, in the “Connection Profiler” wizard , it should give us that the connection is now correct.
Для просмотра ссылки Войди
Step 4: Add the SDK for Linux.
In order to compile projects in Linux, we must (similarly to what is done for other platforms like Android) add the necessary SDK to be able to compile. This step is done automatically by the wizard (SDK Manager) and we only have to select the necessary SDK.
Just go to Tools / Options / SDK Manager and from there add a new one.
Among the platforms available, depending on the installation we have carried out, we will have (Windows, Android, Linux , ...)
Для просмотра ссылки Войди
Just select that we want the Linux SDK and click OK.
Для просмотра ссылки Войди
By default this SDK installs everything necessary for the applications that Delphi (“out of the box”) generates for Linux. In this case, "FMX Linux" allows generating applications with a graphic part, therefore it is necessary to install the necessary dependencies on the Linux machine.
You can install these dependencies with the following command:
sudo apt install libgl1-table-glx libglu1-table libgtk-3-common libgstreamer1.0 libgstreamer-plugins-base1.0
You have the explanation of this step Для просмотра ссылки Войди
Once we have reached this point, we already have the environment ready.
STEP 5: Compile the project for Linux
Now we can open the project that we want to execute and click on it with the right mouse button in the Project Inspector. If everything went well, a new option “Add Linux Platform” appears.

We must select this option and once this is done, the Linux option appears to define it as “Target platform”.

As it could not be otherwise my first project to carry out the tests has been a " Hello world!".
Once compiled and executed, the operation is as expected. ;-D
Here you have some images of the result.

Для просмотра ссылки Войди
With this same project I have tried to Debug (step by step) the program running on Ubuntu and it has worked without problems.
[/SHOWTOGROUPS]
